How To Convert Your Garage Into a Workshop
This step-by-step guide will show you how to simply convert and insulate your garage for use as a workshop or living area.
Our Easy to Install, DIY Insulation Kit is the perfect solution for converting your garage into a useable working space that you can use all year round.
Proven to be Warmer in Winter, Cooler in Summer, our EcoQuilt Expert Insulation is the highest performing multifoil when measuring cost vs performance.
Ecohome-Insulation are the leading UK & European distributor of Multifoil Insulation products. We offer free next working day delivery to the UK Mainland (On Orders placed before 2pm – Orders over £100 + VAT)
view_day Insulation Materials
Method Steps
-
Clear Garage of All Materials
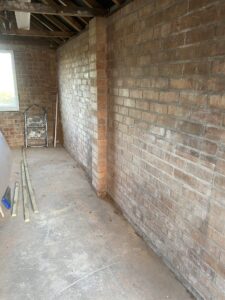
Clear Garage of all materials including any derbis and dirt.
-
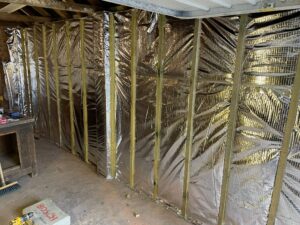
Walls: Install Battens
Fix a minimum of 25mm battens to the wall. We recommend screwing these vertically and spacing the battens at minimum centres of 400mm
-
Walls: Staple Insulation
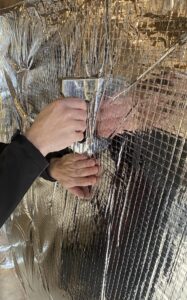
Staple the EcoQuilt Expert to the internal of the battens, creating an air cavity between the wall and insulation. We recommend stapling at intervals of 300mm of less and overlapping the insulation by 50mm.
-
Walls: Tape and Seal
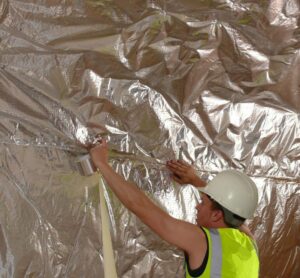
Tape and seal the EcoQuilt Expert using the ThermaSeal Foil Tape (provided in the Insulation Kit) along the perimeter, overlaps and along any cuttings/holes made in the product. This will ensure the Insulation will act as a high performing vapour control layer, eliminating the risk of condensation.
-
Walls: Install Second Battens
Install secondary 25mm battens over the insulation. We recommend fixing these at minimum centres of 400mm and can be installed vertically or horizontally.
-
Walls: Install internal boarding

Fix your chosen internal boarding to the secondary battens. We have used Plywood however Plasterboard or cladding can also be used. You will have created a cavity either side of the insulation, so the foils can perform and reflect properly.
-
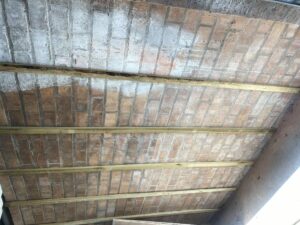
Repeat Steps on the roof
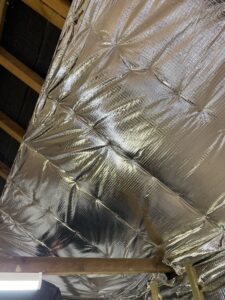
Staple the multifoil insulation directly to the underside of the roofs timber rafters or joists before taping and sealing using ThermaSeal Foil Tape. A secondary counter batten and internal boarding can then be applied, however the insulation can be left exposed if preferred.
-
Floor: Lay FloorFoam
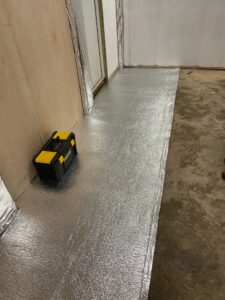
Lay the EcoTec FloorFoam directly onto the wooden or concrete floor and adhere into place using either a non-solvent adhesive, Double SIded Tape or Staple Gun. We recommend butt joining the insulation and not overlapping, as this will ensure the floor is level.
-
Floor: Taping and Sealing
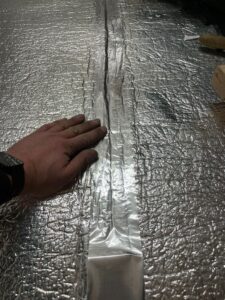
Tape and seal the EcoTec FloorFoam using ThermaSeal Foiil Tape. We recommend to tape along all butt joints, perimeter and along any pipework or cuttings to create a complete seal. This will ensure the product acts as a damp proof membrane, eliminating the risk of condensation forming.
-
Floor: Laying flooring
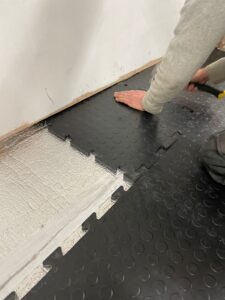
Finally you can now lay your internal garage flooring. As this garage is being converted into a workshop we have used rubber floor tiles, which are very easy to install.
Disclaimer – Ecohome Insulation cannot be held responsible for any losses financially or physically from advice provided in this How-To-Guide.
Recommended fixing materials and good building practice should also be used when undergoing any building works.