How to Install the EcoPro Cellar Insulation Kit
This is a step-by-step guide to show you how to install our EcoPro Cellar Insulation Kit. Whether you’re insulating the ceiling alone to prevent cold bridging from below or your insulating the ceiling and wall to convert your cellar into a usable room.
The EcoPro Cellar Insulation Kit has been designed to reflect heat into your home rather than escape through the cellar if you’re just insulating the ceiling. If you’re insulating the walls as well as the ceiling it’ll help retain heat within the cellar whilst preventing draughts to the rooms above.
At just 15mm thick in its open state, EcoQuilt compresses down to only 6mm thick, if the ceiling of the cellar is quite low this is the perfect solution for you. It’s equivalent to around 50mm of rigid board such as Kingspan or 100mm of Rockwool!
view_day Insulation Materials
Method Steps
-
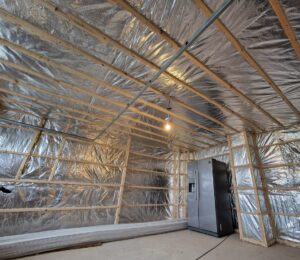
Insulate the ceiling of the cellar
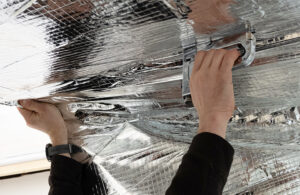
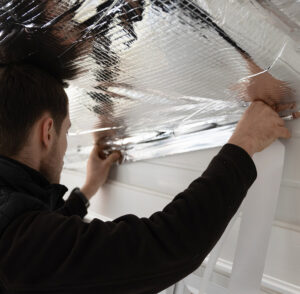
Start by stapling EcoQuilt Expert to the ceiling joists using the Heavy Duty Staple Gun Kit. Ensure that the material is pulled taut across onto the next rafter. Then, Staple down the second rafter at a maximum of 2 inches apart.
-
Secure & Cut off any excess

Once you have secured the first section, cut any excess material off with the sharp blade provided in the EcoPro Cellar Insulation Kit.
-
Repeat the process
Install the next section in the exact same way, stapling to the joists and cutting off any excess. Remember to ensure a 50mm overlap of material.
-
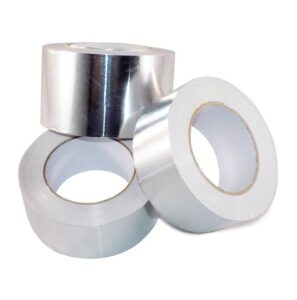
Seal with ThermaSeal Foil Joining Tape
Once you’ve stapled your EcoQuilt, it’s now time to seal all of the joints and perimeter with ThermaSeal Foil Joining Tape. This is what creates the Vapour Control barrier.
-
Fixing your Ceiling counter battens
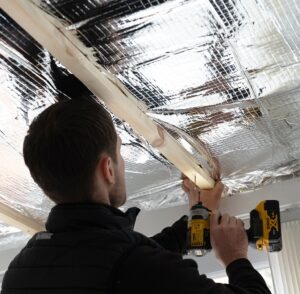
Now you can fix the 19mm battens to secure your EcoQuilt, using screws with a minimum length of 35mm like the Multifoil Insulation Screws. Fix the remaining battens in the same way. Now, you are ready to install the surface finish of your choice. However, you can leave the insulation bare if it's not being used as a livable room. If you're just insulating the ceiling stop here or carry on to the next step if you're insulating the walls as well.
-
It’s time to insulate the walls

For buildings with existing stud work, hold your insulation into place and simply recess the EcoQuilt halfway back by stapling it onto the side of the stud. Ensure a 19mm air gap on either side of the insulation. Then continue by pulling the material taut before securing it onto the next timber stud. Ensure EcoQuilt is stapled at minimum intervals of 300mm, using the 14mm staples provided.
-
Attaching battens (if needed)
If your space does not have timber uprights, you can fit 19mm battens onto the walls using screws prior to step 6.
-
Seal the with ThermaSeal Foil Joining Tape
Now that all of your EcoQuilt is stapled into position, it’s time to seal all overlapping joints and around the perimeter with ThermaSeal Foil Joining Tape to ensure an airtight seal.
-
Fixing your wall counter battens
As you did with the ceiling, fix the 19mm battens to secure your EcoQuilt using screws with a minimum length of 35mm. Fix the battens, in the same place as the existing wall studs. Repeat the exact same process. Now you’re ready to install the final surface finish of your choice and decorate!
Disclaimer – Ecohome Insulation cannot be held responsible for any losses financially or physically from advice provided in this How-To-Guide.