How to Insulate Your Roof Without Any Kingspan or Celotex
This step by step guide shows how to insulate a roof using our Triple Layer System
Our Triple Layer system is proven to save on cost, space, wastage & installation time compared to traditional methods such as Kingspan and Celotex.
Both SuperQuilt and BreatherQuilt included in this system are fully certified. These certifications include LABC & BDA Kiwa. Multifoil Insulation’s Triple Layer system will achieve a minimum U-value of 0.18 on a pitched roof. You are able to retrieve a PDF document displaying the U-value achieved, which can be simply forwarded to building control. To get a copy of this document, please email us at sales@ecohome-insulation.com
Ecohome-Insulation are the leading UK & European distributor of Multifoil Insulation products. We offer free next working day delivery to the UK Mainland (On Orders placed before 2pm & over £100 + VAT)
view_day Insulation Materials
build Tools
Method Steps
-
Install first run of BreatherQuilt
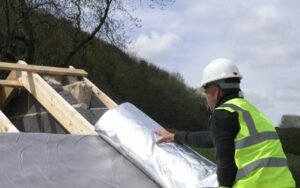
Firstly, install YBS BreatherQuilt on the external of the pitched roof. Ensure the reflective foil is facing internally with the Breather membrane facing outwards. Starting at the bottom of the rafters, staple BreatherQuilt to the first rafter using 14mm staples (recommended 300mm intervals). Roll BreatherQuilt horizontally across each rafter, stapling continuously. BreatherQuilt should sag between the rafters as opposed to being pulled taught. Ensure that once the tile battens are installed, there is a clear 10mm gap between the top layer of BreatherQuilt and the tile battens.
-
Install next run(s) of BreatherQuilt
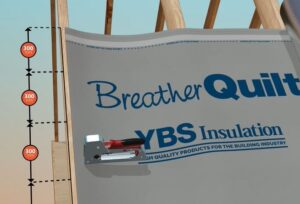
Next, install a further layer of BreatherQuilt, overlapping the product by 100mm and seal using the built in double sided tape. Staple as previously and ensure the tape is secured and sealed. This is to be repeated dependent on how many runs are required for the roof. Additional rolls on the verticals should be butt jointed on the rafters. Ensure the butt jointed rolls are stapled as previous and taped using waterproof tape.
-
Install Tile Battens & Tiles

At the eaves, BreatherQuilt should extend onto a suitable eaves carrier. This works in the same method as standard breather membranes. Proceed next by installing horizontal tile battens, on the top of the BreatherQuilt. Finally, finish by install tiles or slates.
-
Install 2 Layers of SuperQuilt Under Rafter
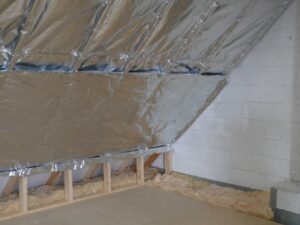
Both layers of SuperQuilt can now be installed from the internal (underside) of the rafters. The first layer of SuperQuilt is to be recessed in-between the rafters, the 2nd layer of SuperQuilt is to be pulled taught as a flat continuous layer, ensuring that there is a clear cavity between both layers of SuperQuilt and BreatherQuilt.
-
Recess 1st Layer of SuperQuilt
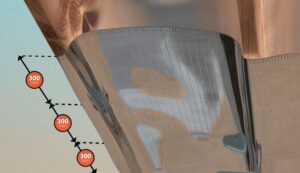
SuperQuilt is stapled to the underside of the first rafter. SuperQuilt is next recessed into the rafter (25mm), and fixed with staples of with battens. The material is then pulled taught and fixed to the opposite rafter. SuperQuilt is then wrapped around the rafter, ensuring stapling regularly, and the procedure starts again. SuperQuilt is overlapped by 50mm, ensure fully tape and seal using Thermaseal Foil Joining Tape over the laps and around the perimeter.
-
Install 2nd Layer of SuperQuilt

Once the first layer of SuperQuilt is installed, proceed by installing the second layer. Staple or nail the second layer through the first layer into the rafters behind. Ensure this layer is also pulled taught, there will then be a cavity between the two layers of SuperQuilt. As per the first layer, the second layer is also overlapped by 50mm. Ensure again the product is fully taped and sealed around the perimeter and overlaps using Thermaseal Foil Joining Tape.
-
Internal Finishing
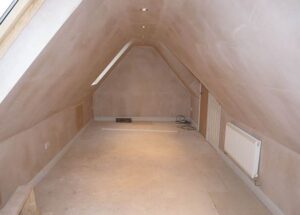
Once both layers are installed and taped, you are ready for your secondary batten & plasterboard. Start by installing 25mm x 38mm battens on the insulation. We advise to cross-batten, however vertical battens can be used if preferred. Finish by installing 12.5mm Plasterboard. There is no requirement for a Foiled-back plasterboard or VCL. SuperQuilt works as a high performance Vapour Control Layer when taped and sealed using the ThermaSeal Foil Tape.
Disclaimer – This guide is based on 100mm Rafters @ 400mm centres, with access to both the internal and external of a pitched roof. SuperQuilt and BreatherQuilt should be installed in harmony with the manufacturers certificate, fixing instructions and good building practice. Our Multifoils are to be cut using a craft knife or a sharp pair of scissors – Available in our Multifoil Fitting Kit. No personal protective equipment, clothing or handling is required.
Ecohome-Insulation cannot be held responsible for any losses financially or physically from advice provided in this How-To-Guide.